Calibrating the Machine
So, built the machine and ready to carve ... this is the point where most people start carving and I was one of those people ... until you run into another common question that we see ... "why does my XCarve cut deeper on one side?" ... well, that's because you didn't calibrate it.
Okay, so you want everything to be fairly "level" but the calibration does not require a spirit level, like ever. It's far more important to have elements of the machine square and parallel to each other. I'll describe my "calibration" process and will link a few resources for taking things further. The main calibration processes include five main areas and (my opinion is that) they should be checked and addressed in the order I have written them, below.
Okay, so you want everything to be fairly "level" but the calibration does not require a spirit level, like ever. It's far more important to have elements of the machine square and parallel to each other. I'll describe my "calibration" process and will link a few resources for taking things further. The main calibration processes include five main areas and (my opinion is that) they should be checked and addressed in the order I have written them, below.
1. Setting Square
Check that the gantry rail is square with the two Y rails
Using a square (the bigger, the better) check the rails and bring them into square; I would start by making the left hand Y rail square to the wasteboard, then make the gantry square to the left Y rail, make the right Y rail square to the gantry, which should also make it square to the right hand side of the waste board. You can loosen the screws at the four corners and those which hold down the wasteboard to adjust the Y rails and you can adjust the belts to affect the gantry.
Using a square (the bigger, the better) check the rails and bring them into square; I would start by making the left hand Y rail square to the wasteboard, then make the gantry square to the left Y rail, make the right Y rail square to the gantry, which should also make it square to the right hand side of the waste board. You can loosen the screws at the four corners and those which hold down the wasteboard to adjust the Y rails and you can adjust the belts to affect the gantry.
2. Parallel from LEFT-RIGHT and/or FRONT-BACK
Check that the wasteboard is running paralled to the rails, which is symptomatic, when the router travels from the LEFT edge to the RIGHT edge and the distance between the router and the workpiece changes, resulting in a deeper depth of carve on one side.
To calibrate for this, turn the router off move it to the position 0,0 and put in a bit, lower the router so that it's about 10mm of the wasteboard; jog the router from one side to the other, taking note of the gap between the bit/board, looking for any spots where the gap closes. If the gap remains fairly consisitent, repeat the process, reducing the gap from 10mm and keep repeating until the gap has almost been closed.
If you notice that the gap is increasing from one side to the other, loosen the screws at the corner support plates for the Y rails and use the little "slack" in thos screws to make some adjustments; this can be used to adjust out a few millimeters of inaccuracy. After any adjustment, repeat the process.
When I did this, I went all around the board maybe a dozen time and spend about 2 hours making small adjustments to get the gap pretty consistent around the board, before moving on to the next step.
3. Dealing with high/low spots
Because the waste board has been stored in the factory, it's been shipped and of course, it's made from wood, there may be high/low spots which are caused by warping or cupping of the board, slight bends in the support rails under the board, etc.,
When I was checking for this, I used a seimilar process as I had done in step 2, but this time, I was looking for the high/low spots in 14 specific locations, which were the 4 corners of the waste board, the 2 locations between the corners where the board is screwed down to the rails and the two locations in the middle of the board. Rather than making adjustments to the corner supports (which I was now happy with) I looked to "shim" the board and my approach for this was to use the router in each of the 14 locations with the bit lowered to find the highest of the 14 spots and would slide in enough playing cards between the bit/board so that the top card was just being scratched by the bit ... and repeat at the other 13 locations, which gave me 14 stacks of cards.
If there was a stack of 4 cards in a location, I knew that shimming the board up by cards would make it touch... so I loosened the screws that were holding the wasteboard to the support rails and put the playing cards in and tighten the screws down.
I repeated this step and added/removed a card here and there to fine tune the board a little. When I was happy, I repeated step 2 and found that no further adjustment was needed.
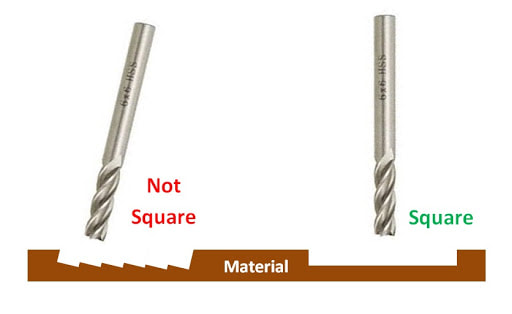
4. The Z-Axis being exactly 90' to the work piece; known as the "Tram"
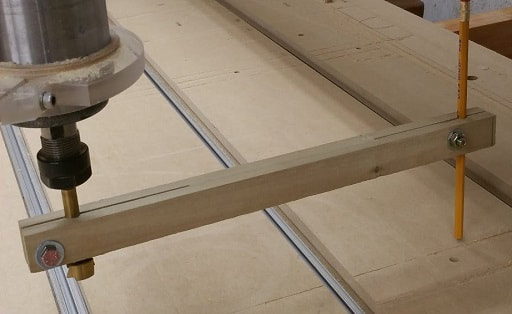
This is a step that's next on my list and whilst I am yet to try it, I have it clear in my head how I can do this,without spending a fortune on micrometers ... the picture on the left shows an exaggeration of what your bit is doing, when the tram is off ... and the picture on the right is the approach that I will be using, making my own "arm", as shown in the image. That arm is shown in action in this YouTube Guide attach it and rotate (by hand) and it "should" remain the same distance from the board all the way around. Adjusting the v-wheels on the Z-axis will correct the tram from left/right and adusting the v-wheels at the end of the ganrty will adjust front/back.
5. The Step Ratio
For example, if you design a square that is 200mm x 200mm and the carve comes out a different size, your ratio needs adjusting and as much as I would love to describe the process to calibrating this, I must direct you to the Designs by Phil website which covers the subject perfectly, in fact, I would recommend taking your time to have a thorough read of the site as there is a LOT of useful information there.
Additional References
- Levelling & Tram Guide by Chris Parsley
- Designs by Phil has extensive guides/tips


